
Architectural Informatics 2 |
AutoCAD 2D·1 • Gothic Window |
Digital Representation |
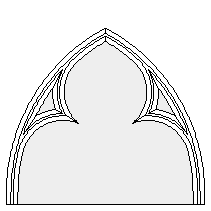 |
Exercise: draw a simple Gothic window without using any numerical dimensions! |
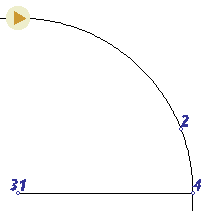 |
Figure ADraw a Circle using two arbitrary points (1 and 2).
•> Circle[Enter] 1, 2 (•>type the command (or its alias), or click on its icon on the toolbar, then click with the left mouse button to specify point 1, finally (after moving the cursor to the right) click again to to specify point 2. » You may use [Space] instead of [Enter]. Draw a Line from the Center of the Circle to one of its Quadrant points.
•> Line CEN 3 QUA 4 [Enter] (the last [Enter] (or an [Esc]) stops the command). » Use the OSnap (Object Snap) modes in order to find the exact locations! |
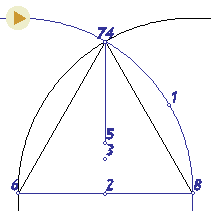 |
Figure BMirror the Circle (1) about a vertical axis passing through the Midpont of the Line (2, 3)!
•> MIrror 1 [Enter] MID 2, 3 [Enter] (•>the first [Enter] finishes the selection process, the second one specifies that the original Circle shouldn't be erased. » Use the Ortho mode to find the vertical direction! 
•> Line 4, 5 [Enter] (use [Enter] to stop the command). •> [Enter] 6, 7, 8 [Enter] (use [Enter] to restart the command). » You have to click on the elements: this way OSnap overrides Ortho. |
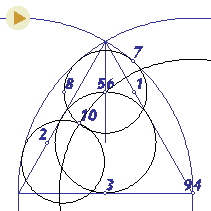 |
Figure CDraw a Circle tangent to the Lines forming the triangle!
•> CirCle 3P TAN 1 TAN 2, MID 3 •> [Enter] 4, 5 [Enter] 6 TAN 7 •> MIrror 8 [Enter] 9, 10 [Enter] |
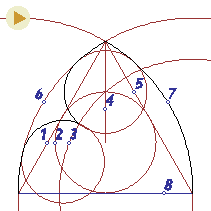 |
Figure DErase the unnecessary elements (1, 2, 3, 4, 5).
•> Erase 1, 2, 3, 4, 5 [Enter] Trim the unnecessary parts of the elements using the very same elements as cutting edges.
•> TRim 6, 7, 8 [Enter] click on the unnecessary parts of the big circles [Enter] •> [Enter] All [Enter] get rid of every part that is not needed [Enter] » When you have to select more elements, the All, Previous, Last (Remove, Add, Undo, Redo…) options are often useful. » Trimmed Circles are (obviously) converted to Arcs. |
 |
Figure EConvert the five Arcs to a single PolyLine using the PEdit command!
•> PEdit 1Join 2, 3 [Enter] [Enter] » When the PEDITACCEPT variable is set to 1, the first selected element is automatically converted to a polyline. Scale the Line (4) with a scale factor of 1/15, then
Move the shortened Line outside the base!
Scale the Line again with a scale factor of 1/5 using its Midpoint as the center point
in order to get the 2:1:2 proportions of the profile!
•> SCale 4 [Enter] 5 1/15 •> Move Previous [Enter] 6, 7 (•>vector of movement) •> SCale P [Enter] MID 8 1/5 |
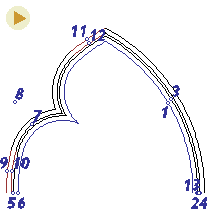 |
Figure FCreate the parallel passing through the Endpoints of the Line!
•> Offset T 1, (•>select the original element) 2, (•>specify the point, through which the copy should pass) 3, 4 [Enter] •> Offset 5, 6, (•>specify the offset distance with two points) 7, (•>select the source element) 8 (•>specify a point on the side of the object you want to offset) Explode the PolyLines, and Erase the unnecessary Arcs (9, 10, 11, 12, 13)!
•> EXplode All [Enter] •> Erase 9, 10, 11, 12, 13 |
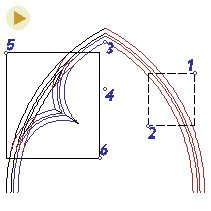 |
Figure GMirror the right side of the arch about a vertical axis passing through the apex, erasing the original arcs.
•> Mirror 1, 2 [Enter] END 3, 4 Y [Enter] Zoom closer in order to see .
•> Zoom 5, 6 » You can return to the previous view using the Previous option of the same command (Z P ). Draw the Lines connecting the Intersections of the arcs, then Trim the arcs using these Lines as cutting edges! Return to the previous view (Zoom Previous), draw the two short Lines at the apex, and Mirror the elements!
Draw a horizontal Line at the bottom, then fill the enclosed areas using the Hatch command! (See the topmost figure) |
Peredy J., Strommer L. • BME Department of Architectural Representation


